Labels

Wednesday, August 31, 2011

Traditional Scones

I have made scones before but they always lacked something. It wasn't fluffy and moist like the cafe's and they were always flat. So I trawled the Internet, looking for a recipe that met the LaLa Kitchen criteria - minimal yet accessible ingredients and lo' and behold I found my recipe which is a variation to the Country Women's Association recipe. Before attempting this recipe yourself, I would suggest you read this recipe in its entirety, including the Notes and Variation at the bottom as the baking of scones requires a bit of love and care on your behalf.


Makes approximately 8 | 30 minutes
Ingredients
2 cups self-raising flour
1/teaspoon salt 
75mL thickened cream
2/3  cup buttermilk 

1. Pre-heat your oven to 220C and line a tray with baking paper. Then sift your dry ingredients into a bowl. 


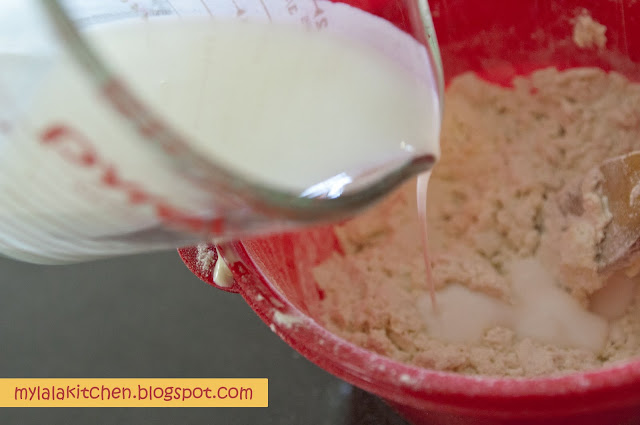
2. Make a well in the centre of your bowl of dry ingredients, pour in the thickened cream and mix. Then bit-by-bit add buttermilk to the bowl, mixing it in before adding more. 


3. After step two you should have a sticky, yet soft dough. Now, create a floured bench surface to work with the dough.


4. Work the dough quickly yet gently to shape into a rectangle shape with a thickness of no less than 3cm. Then using a cutter, create your scones and line them close together on the lining tray to enable them to rise high. 


5. Lightly brush the top of the scones with a bit of butter milk before putting into the oven.


6. Bake the scones for approximately 15 minutes or until golden brown and serve immediately with jam and cream. 


Notes and Variations
I mentioned earlier that I had made scones in the past and there never quite up to my expectation. While trawling through various scone recipes I picked up what I think are some key pointers to achieve the perfect scone. 
Firstly, do not over-work the dough as you risk reducing the fluffiness of the scone and it goes hard. Avoid the rolling pin; if possible, use your hands, and work with your scone dough only when necessary. Placement of the scones on the baking tray is also influential, as keeping the scones close together while baking allows the scones to rise higher than if they were separated. Bit of peer pressure happening there! Cutting is also important, ensuring that you use a sharp cutter and not the rim of a glass to create a circle shape. Finally, take note of the thickness of your dough just before cutting.  Too thin and you have a scone that will barely rise; too thick and you will have a scone that might not cook through, unless you like the semi-cooked type. 
By taking in these notes, you will have the most sumptuous scones to chow down for breakfast or afternoon tea. You can add other ingredients such as fruits (sultanas or blueberries) or even chocolate to spice up your scones. However I like mine the traditional way, with a cup of tea. Enjoy! 

Sunday, August 28, 2011

90 Second Nutella Chocolate Cake

When my sister showed me this recipe I just *had* to try it. I'm sure everyone can relate to those times after dinner where you think, 'I could really go for some cake right now' but can't be bothered baking? Well this recipe is just perfect for those occasions; you can cook cake less than it takes to make 2 minute Maggi noodles. And not only is it great for satisfying those random cake cravings, but the serving is just right for two (a small serving for two or a massive serving of one depending on how bad you want cake) and it is SO easy for the kids to do too. Can you believe it took longer to write this blog than it did to make the cake? 


Makes 2 small serves or 1 decent serve | Less than 5 minutes
Ingredients 
2 tablespoon Nutella, extra for topping
1 egg, beaten
1 heaping tablespoon flour
1/2 teaspoon baking powder
1 teaspoon cocoa powder
1 tablespoon brown sugar
A dash of milk for the topping


1. Put all the ingredients (except for the milk) into a bowl and mix, ensuring there are no flour lumps.


2. Grease a big microwavable bowl or two small bowls (like ramekins) and pour the batter into it. 


3. Place one bowl in the microwave on medium power for 80 seconds and then check for fluffiness. When you are happy with the result, warm up extra nutella and mix with milk to get a runny chocolate to pour over your cake.


Notes and Variations
Now I must emphasis that the '90 second' bit to the title of this recipe is a variable; the power of your microwave, as well as how soft you like your cake, is going to determine this value. When I made this recipe, I was using a 1200 watt microwave so when I mention the timing of zapping this cake into the microwave, please adjust it accordingly to your microwave. 
While the recipe title does say 90 seconds, I didn't like the consistency of the cake when cooked for that long. So it took me a couple of goes to get it to the consistency that I liked, which is what I have written in the recipe. The original recipe, and others like it, did say it would take a few goes before you had something you were happy with. 

** Original recipe from Back to her Roots blog **

Friday, August 26, 2011

Strawberry Shortcake

Taking full advantage of the strawberries in season at the moment, I found this delicious recipe. The cream, the strawberries and the shortcake just complimented each other so well and I found this to be perfect for satisfying those afternoon sweet cravings. Served with your favourite cup of tea, you have your own high-tea affair at your own home. 


Makes 6 | 30 minutes
Ingredients
1 cup plain flour
1/2 teaspoon salt
1 1/2 teaspoon baking powder
1 teaspoon sugar
1/2 cup thickened cream
2 tablespoons unsalted butter
strawberries
whipped cream
1/2 teaspoon caster sugar

1. Preheat your oven to 200⁰C and line a tray with baking paper. 

2. Combine flour, salt, baking powder and sugar into a bowl and mix together with a fork.


3. Slowly add the thickened cream to the bowl, using the fork to mix it in with the other ingredients.


4. Gather the dough from the bowl onto a lightly floured surface. 


5. Knead your dough for around 30 seconds, so as not to overwork it, and mould the dough into a rectangle shape of approximately 1cm thickness.


6. Baste one side of the dough with melted butter.


7. Cut the dough into six portions and transfer onto a baking tray with the buttered side facing down. Baste the top side of the dough with the remaining butter.


8. Place the tray into the oven and cook the dough for approximately 15 minutes or until a beautiful golden brown.  While waiting, cut your strawberries into quarters and mix with caster sugar, allowing it to sit until the shortcake is ready.


9. When the shortcake is ready, remove from the oven and assemble as soon as you are able to touch the cake while warm. Shortcake as the base, then topped with strawberry and whipped cream. 


** Original recipe from Eat Your Vegetable Blog **


Thursday, August 25, 2011

Beef & Broccoli Stir Fry

There are many varieties of stir-fry out there but I am a big fan of saucy stir-fries! The sauce in this stir-fry recipe is thick and coats the hot steamed rice beautifully. Healthy, quick and delicious. What more can you ask for?


4 servings | 30 minutes
Ingredients
500g beef strips or frying steak
2 bunches of broccoli
1 1/4 cup beef stock
2 tablespoon caster sugar
2 tablespoon soy sauce
4 tablespoon plain flour
1 teaspoon grated fresh or minced ginger
1 teaspoon mince garlic
Olive oil for frying


1. Cut your broccoli into florets. If you have purchased frying steak, cut into strips.


2. In a small bowl, combine flour, stock, sugar and soy sauce until you get a smooth, lump-free sauce. 


3. In a large wok (on high heat) heat up your oil and fry mince and garlic before adding beef and cooking till browned.


4. When meat has been browned, add in your sauce. 


5. As your wok is currently set on a high heat you will notice the sauce thickening up real quick so reduce the heat. Add your broccoli and mix all the ingredients together in the wok and leave to simmer for 5-10 minutes before serving on a hot bed of rice. 


Notes and Variations
The beauty with stir-fries is you can always add more vegetables to it; so I think capsicum, carrot, baby corn and snow peas would make a great addition to this stir-fry.
If rice isn't your thing, you can substitute it with noodles and cook them according to the packet instructions. Thick egg noodles would be wonderful for this. The same goes with the meat; if you are not keen on beef, you can use chicken or pork. It is such a beautifully versatile recipe that you can experiment with. 

** Original recipe from All Recipes Broccoli & Ginger Beef Stir-Fry **

Wednesday, August 24, 2011

Quickie Quiche

This recipe was made by request from my husband who loves quiche. Now the only experience I've had with eating quiche are those frozen party quiches. I've never tasted a fresh quiche, let alone made one, so this was going to be quite the experience for me. Going through a few quiche recipes, I opted for the pastry-less version because I often find I don't have such an item in my freezer. I think this would be great for those nights when you really can't be bothered making dinner, yet you also don't want to settle for greasy take-away that you know you're going to regret later. So this is my Quickie Quiche recipe, which is so easy that the kids could probably make it too!


Serves 6 | 45 minutes
Ingredients
4 eggs
125g grated cheese
125g chopped bacon
100g sliced mushrooms
1 onion, finely chopped
½ cup self raising flour
1½ cups milk
1 tablespoon parsley
Spray of olive oil

1. Preheat your oven to 180°C and line your tray (quiche, baking or cake) with grease or baking paper. Dice your onions and slice your mushrooms.


2. On medium heat, fry up your onions and bacon until reasonably cooked. Then add mushrooms.


3. When mushrooms are semi-cooked, transfer the onions, bacon and mushrooms into a bowl.


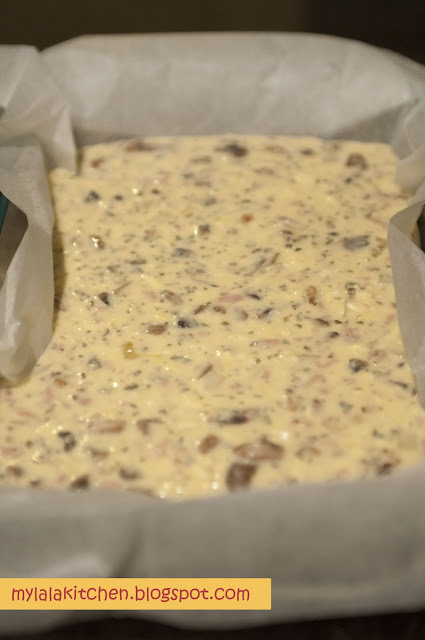
4. Add the remaining ingredients into the bowl and mix through. Once thoroughly mixed through, transfer onto your baking dish.


5. Place into your oven to cook for approximately 30 minutes or until set. The top of the quiche should be lightly golden at the top. Let it to slightly cool and serve.


Notes and Variations
What I love about this recipe is its versatility; remove the ham to make it a lovely vegetarian dish, or add more vegetables for more content. You could also pour this mixture into greased muffin tins to create 'baby quiches' for parties or purely for defining serving size. See what I mean about the versatility? 
Finally quiche can be enjoyed warm or cold but remember because of the egg and milk ingredients, I tend to make sure its eaten within 24 hours of making (I know I'm a bit narky about these things) but with my son having now discovered the joy of quiche, I don't think I'll be having much difficulty ensuring it gets eaten. 

Monday, August 22, 2011

Chicken and Sweet Corn Soup

Whenever I order this lovely soup at our local Chinese restaurant, there's just never enough; I could seriously eat this as a meal on its own. Chicken and Sweet Corn Soup features constantly in our take-away and dine-in orders. Now it's a regular on our kitchen table and can be at yours too.


Serves 4 | 30 minutes
Ingredients
3 pieces of thigh cutlets 
1L water
2 eggs
2 cans creamed corn
1 tablespoon light soy sauce
1 teaspoon fish sauce
salt and pepper to taste
spring onions to garnish

1. Boil your chicken cutlets until cooked and then set aside to cool. Make sure you turn off the stove at this stage.


2. Remove chicken from the stock and shred into pieces. Leave 250mL of boiled chicken stock in the pot; the remaining can be stored in the fridge as stock for another time.

3. Turn the stove back on to a medium/low heat with the remaining 250mL of chicken stock. Pour in the two cans of creamed corn and stir through, breaking the clumps of creamed corn.


4. Add shredded chicken to the pot and mix in.


5. Add light soy sauce and fish sauce to the soup and season with salt and pepper to taste. Stir through.


6. Crack the two eggs into the soup. When done, you will need to fish the yolks to break up.


7. Leave to cook through for another 5-10 minutes before garnishing with spring onion and serving.


Notes and Variations
Like myself, there are occasions when time isn't on our side and we don't always have the luxury to enjoy boiling fresh chicken to make stock. For those that are time-limited, chicken stock in step one can be achieved by making stock using using stock cubes or purchasing ready-made liquid stock and shredding cooked chicken from the supermarket. 
Egg is also an alternative to thickening the soup; you can easily substitute this with flour or cornstarch. 
Finally you can add vegetables such as asparagus to compliment this beautiful soup. Enjoy :) 

Strawberry and Nutella Pop Tarts

I'll be honest with you; I've never tasted a packaged pop-tart, like the ones you get at the supermarket. So while I can't really compare, I could probably assume that being freshly made, this pop-tart would taste a million times better and fresher than the packaged product you would buy. What really appealed to me about this recipe was the little ingredients used and Nutella, because everything is just a million times better when Nutella is involved, so I thought I'd give this recipe a go!


Serves 5 | 30 minutes
Ingredients
2 sheets of puff pastry
1 punnet of strawberries
2 tablespoons of Nutella
2 tablespoons chocolate bits

1. Preheat your oven to 180C and line a baking tray with baking paper. I like to spray a bit of oil on the baking paper to get the base of the pop tart to be golden and crispy. While your oven is pre-heating, dice your strawberries.


2. Cut your puff pastry into six (roughly sized) rectangles


3. For three of the six rectangles, spread Nutella and place strawberries on top. Make sure you do this in the centre of the rectangle.


4. Seal your pop tart by placing another cut rectangle puff pastry (the remaining three of six) on top of the filling and seal the edges with the fork and placing a small air hole at the top of the pop tart. 


5. Place your pop tarts on the baking tray and bake for approximately 15 minutes or until golden brown. 


6. In the mean time, melt your chocolate bits and any remaining Nutella spread in the microwave for approximately 45 seconds on medium high heat. Place it in a plastic sealed bag, cutting a small bit of the corner off, to make a makeshift piping bag. 


7. When the pop tarts are cooked to your liking, place them on a cooling rack and drizzle with chocolate using the piping bag in step six. Serve up with your favourite coffee or tea. 


Notes and Variations
Don't feel limited to using strawberry and Nutella as a filling for your pop tarts. Blueberries, raspberries, cream chesese or honey could be used too.

** Original recipe from Savouring the Thyme's Nutella Strawberry White Chocolate Pop Tarts recipe ** 


Thursday, August 18, 2011

Spaghetti Carbonara

This is probably one of my all time favourite dishes. The problem is though whenever I buy this at a restaurant, it's always made so heavy that I don't feel too good by the end of the meal. Oh and the amount of excess oils! Eeek! How happy was I to find a more simpler, less heavy version of my favourite meal. 


Makes 4 | 30 minutes
Ingredients
3 bacon rashers
1 broccoli bunch
1 small onion
100g sliced button mushrooms
200mL thickened cream
3 tablespoon grated parmesan cheese
1 tablespoon minced garlic
1 packet dry spaghetti
1 tablespoon plain flour
3 second spray of olive oil
salt and pepper for seasoning


1. Make spaghetti as per packet instructions. When cooked drain and set aside. 


2. Cut bacon rashers into strips, broccoli into small florets, slice button mushrooms and dice onion. 


3. Heat up saucepan to medium heat and spray with olive oil. Add onion and garlic. When it starts to sizzle, add your bacon and mix together. 


4. Add your mushrooms and stir in. Keep on heat until the mushrooms are semi-cooked. 


5. Add thickened cream parmesan cheese and flour to the saucepan and stir to mix all the ingredients in the pan. You may want to add salt and pepper to season at this stage. 


6. Add the broccoli florets into the saucepan. Mix through and then cover with the lid. Depending on how soft you want your broccoli to be will determine how long you need to keep the lid on. I like mine soft so I leave for the lid of for no more than 10 minutes on medium heat. 


7. When the broccoli is cooked to your liking, serve with boiled pasta. 


Notes and Variations
The fantastic thing about this recipe is that it is so versatile. While not as greasy as the restaurants, the ingredients I have listed here makes for a 'heavy' meal. If you are one to count kilojoules, it is so easy to modify the ingredients. Swap the bacon for pancetta or a leaner cut of bacon (you might have to add a touch more oil just to grease up the pan). You can use gluten free pasta as well as substituting thickened cream with light evaporated milk and skim milk to replace the half cup of milk.